第 3 部分:依赖管理
学习项目依赖和 Gradle 依赖管理的基础知识。
步骤 1. 理解版本目录
在 Gradle 中,构建脚本的 dependencies {} 块是您声明项目所需外部库的位置。
此块中的每一行都告诉 Gradle 两件事
-
依赖是什么(例如 Guava 或 JUnit)
-
如何使用它(用于生产代码、测试代码等)
例如:
dependencies {
    implementation("com.google.guava:guava:32.1.2-jre") (1)
    testRuntimeOnly("org.junit.platform:junit-platform-launcher")
    testImplementation("org.junit.jupiter:junit-jupiter:5.10.1") (2)
}| 1 | implementation(guava):这意味着您的主应用程序代码依赖于 Guava 库。Gradle 将从存储库下载它并将其包含在编译和运行时类路径中。 |
| 2 | testImplementation(jupiter):这意味着您的测试代码依赖于 JUnit Jupiter(一个测试库)。它仅在测试期间可用——不在最终打包的应用程序中。 |
在第 1 部分中,Gradle init 创建了一个使用版本目录的项目。
版本目录是一个中心文件,定义了您可以在整个构建中使用的库版本和别名。它有助于保持子项目之间的依赖关系一致,并避免重复版本号。
版本目录位于 gradle/libs.versions.toml
[versions]
guava = "33.3.1-jre"
junit-jupiter = "5.11.3"

[libraries]
guava = { module = "com.google.guava:guava", version.ref = "guava" }
junit-jupiter = { module = "org.junit.jupiter:junit-jupiter", version.ref = "junit-jupiter" }
一旦定义,您可以使用 libs 访问器在 build.gradle(.kts) 文件中引用这些库。这就是为什么我们的构建脚本实际看起来像这样
dependencies {  (2)
    // Use JUnit Jupiter for testing.
    testImplementation(libs.junit.jupiter)

    testRuntimeOnly("org.junit.platform:junit-platform-launcher")

    // This dependency is used by the application.
    implementation(libs.guava)
}dependencies { (2)
// Use JUnit Jupiter for testing.
testImplementation libs.junit.jupiter
testRuntimeOnly 'org.junit.platform:junit-platform-launcher'
// This dependency is used by the application.
implementation libs.guava
}使用 libs.junit.jupiter 语法是因为键中包含连字符,这是一个特殊字符。 |
与直接在构建脚本中声明依赖项相比,版本目录具有许多优点
-
Gradle 从目录生成类型安全的访问器,因此您可以在 IDE 中轻松地通过自动补全添加依赖项。
-
它是声明依赖项版本的中心位置,因此任何更改都适用于每个子项目。
步骤 2. 理解项目依赖
Gradle 为依赖管理和自动化提供了出色的支持。
让我们再看看我们的构建脚本,特别是以下部分
repositories {
// Use Maven Central for resolving dependencies.
mavenCentral()
}
dependencies { (2)
// Use JUnit Jupiter for testing.
testImplementation(libs.junit.jupiter)
testRuntimeOnly("org.junit.platform:junit-platform-launcher")
// This dependency is used by the application.
implementation(libs.guava)
}repositories {
// Use Maven Central for resolving dependencies.
mavenCentral()
}
dependencies {  (2)
    // Use JUnit Jupiter for testing.
    testImplementation libs.junit.jupiter

    testRuntimeOnly 'org.junit.platform:junit-platform-launcher'

    // This dependency is used by the application.
    implementation libs.guava
}Gradle 依赖管理中的一些关键概念包括
- 仓库
-
依赖源 → 我们的应用程序中的
mavenCentral()。 - 依赖项
-
通过配置类型声明的依赖项 → 我们的应用程序中的
libs.junit.jupiter和libs.guava。
Maven Central 仓库是 Maven 社区提供并由 Sonatype 支持的 jar 文件、插件和库的集合。它是 Java 的事实上的公共工件存储,并被许多构建系统使用。
Gradle 需要特定的信息,称为 GAV 坐标,才能定位和下载依赖项。GAV 代表 Group、Artifact 和 Version — 唯一标识存储库中库的三个信息片段。让我们看看 libs.guava 和 libs.junit.jupiter
| 描述 | com.google.guava:guava:33.3.1-jre | org.junit.jupiter:junit-jupiter-api:5.11.3 | |
|---|---|---|---|
Group |
组织标识符 |
|
|
Artifact (名称) |
依赖标识符 |
|
|
Version |
要导入的版本号 |
|
|
步骤 3. 理解传递性依赖
传递性依赖是依赖的依赖。
为了使我们的 guava 依赖能够工作,它需要一个名为 failureaccess 的库。因此 failureaccess 是项目的传递性依赖。
步骤 4. 查看项目依赖
您可以使用 ./gradlew :app:dependencies 命令在终端中查看依赖树
$ ./gradlew :app:dependencies

> Task :app:dependencies

------------------------------------------------------------
Project ':app'
------------------------------------------------------------

...

runtimeClasspath - Runtime classpath of source set 'main'.
\--- com.google.guava:guava:33.3.1-jre
     +--- com.google.guava:failureaccess:1.0.2
     +--- com.google.guava:listenablefuture:9999.0-empty-to-avoid-conflict-with-guava
     +--- com.google.code.findbugs:jsr305:3.0.2
     +--- org.checkerframework:checker-qual:3.43.0
     +--- com.google.errorprone:error_prone_annotations:2.28.0
     \--- com.google.j2objc:j2objc-annotations:3.0.0

testRuntimeClasspath - Runtime classpath of source set 'test'.
+--- com.google.guava:guava:33.3.1-jre
|    +--- com.google.guava:failureaccess:1.0.2
|    +--- com.google.guava:listenablefuture:9999.0-empty-to-avoid-conflict-with-guava
|    +--- com.google.code.findbugs:jsr305:3.0.2
|    +--- org.checkerframework:checker-qual:3.43.0
|    +--- com.google.errorprone:error_prone_annotations:2.28.0
|    \--- com.google.j2objc:j2objc-annotations:3.0.0
+--- org.junit.jupiter:junit-jupiter:5.11.3
|    +--- org.junit:junit-bom:5.11.3
|    |    +--- org.junit.jupiter:junit-jupiter:5.11.3 (c)
|    |    +--- org.junit.jupiter:junit-jupiter-api:5.11.3 (c)
|    |    +--- org.junit.jupiter:junit-jupiter-engine:5.11.3 (c)
|    |    +--- org.junit.jupiter:junit-jupiter-params:5.11.3 (c)
|    |    +--- org.junit.platform:junit-platform-launcher:1.11.3 (c)
|    |    +--- org.junit.platform:junit-platform-commons:1.11.3 (c)
|    |    \--- org.junit.platform:junit-platform-engine:1.11.3 (c)
|    +--- org.junit.jupiter:junit-jupiter-api:5.11.3
|    |    +--- org.junit:junit-bom:5.11.3 (*)
|    |    +--- org.opentest4j:opentest4j:1.3.0
|    |    \--- org.junit.platform:junit-platform-commons:1.11.3
|    |         \--- org.junit:junit-bom:5.11.3 (*)
|    +--- org.junit.jupiter:junit-jupiter-params:5.11.3
|    |    +--- org.junit:junit-bom:5.11.3 (*)
|    |    \--- org.junit.jupiter:junit-jupiter-api:5.11.3 (*)
|    \--- org.junit.jupiter:junit-jupiter-engine:5.11.3
|         +--- org.junit:junit-bom:5.11.3 (*)
|         +--- org.junit.platform:junit-platform-engine:1.11.3
|         |    +--- org.junit:junit-bom:5.11.3 (*)
|         |    +--- org.opentest4j:opentest4j:1.3.0
|         |    \--- org.junit.platform:junit-platform-commons:1.11.3 (*)
|         \--- org.junit.jupiter:junit-jupiter-api:5.11.3 (*)
\--- org.junit.platform:junit-platform-launcher -> 1.11.3
     +--- org.junit:junit-bom:5.11.3 (*)
     \--- org.junit.platform:junit-platform-engine:1.11.3 (*)
输出清楚地表明 com.google.guava:guava:33.3.1-jre 依赖于 com.google.guava:failureaccess:1.0.2。
步骤 5. 在 Build Scan® 中查看依赖
要使用 Build Scan 查看依赖项,请使用可选的 --scan 标志运行构建任务。
在 tutorial 目录中,输入以下命令并按照提示接受条款
$ ./gradlew build --scan
BUILD SUCCESSFUL in 423ms
7 actionable tasks: 7 up-to-date
Publishing a Build Scan to scans.gradle.com requires accepting the Gradle Terms of Service defined at https://gradle.com/terms-of-service. Do you accept these terms? [yes, no] yes
Gradle Terms of Service accepted.
Publishing Build Scan...
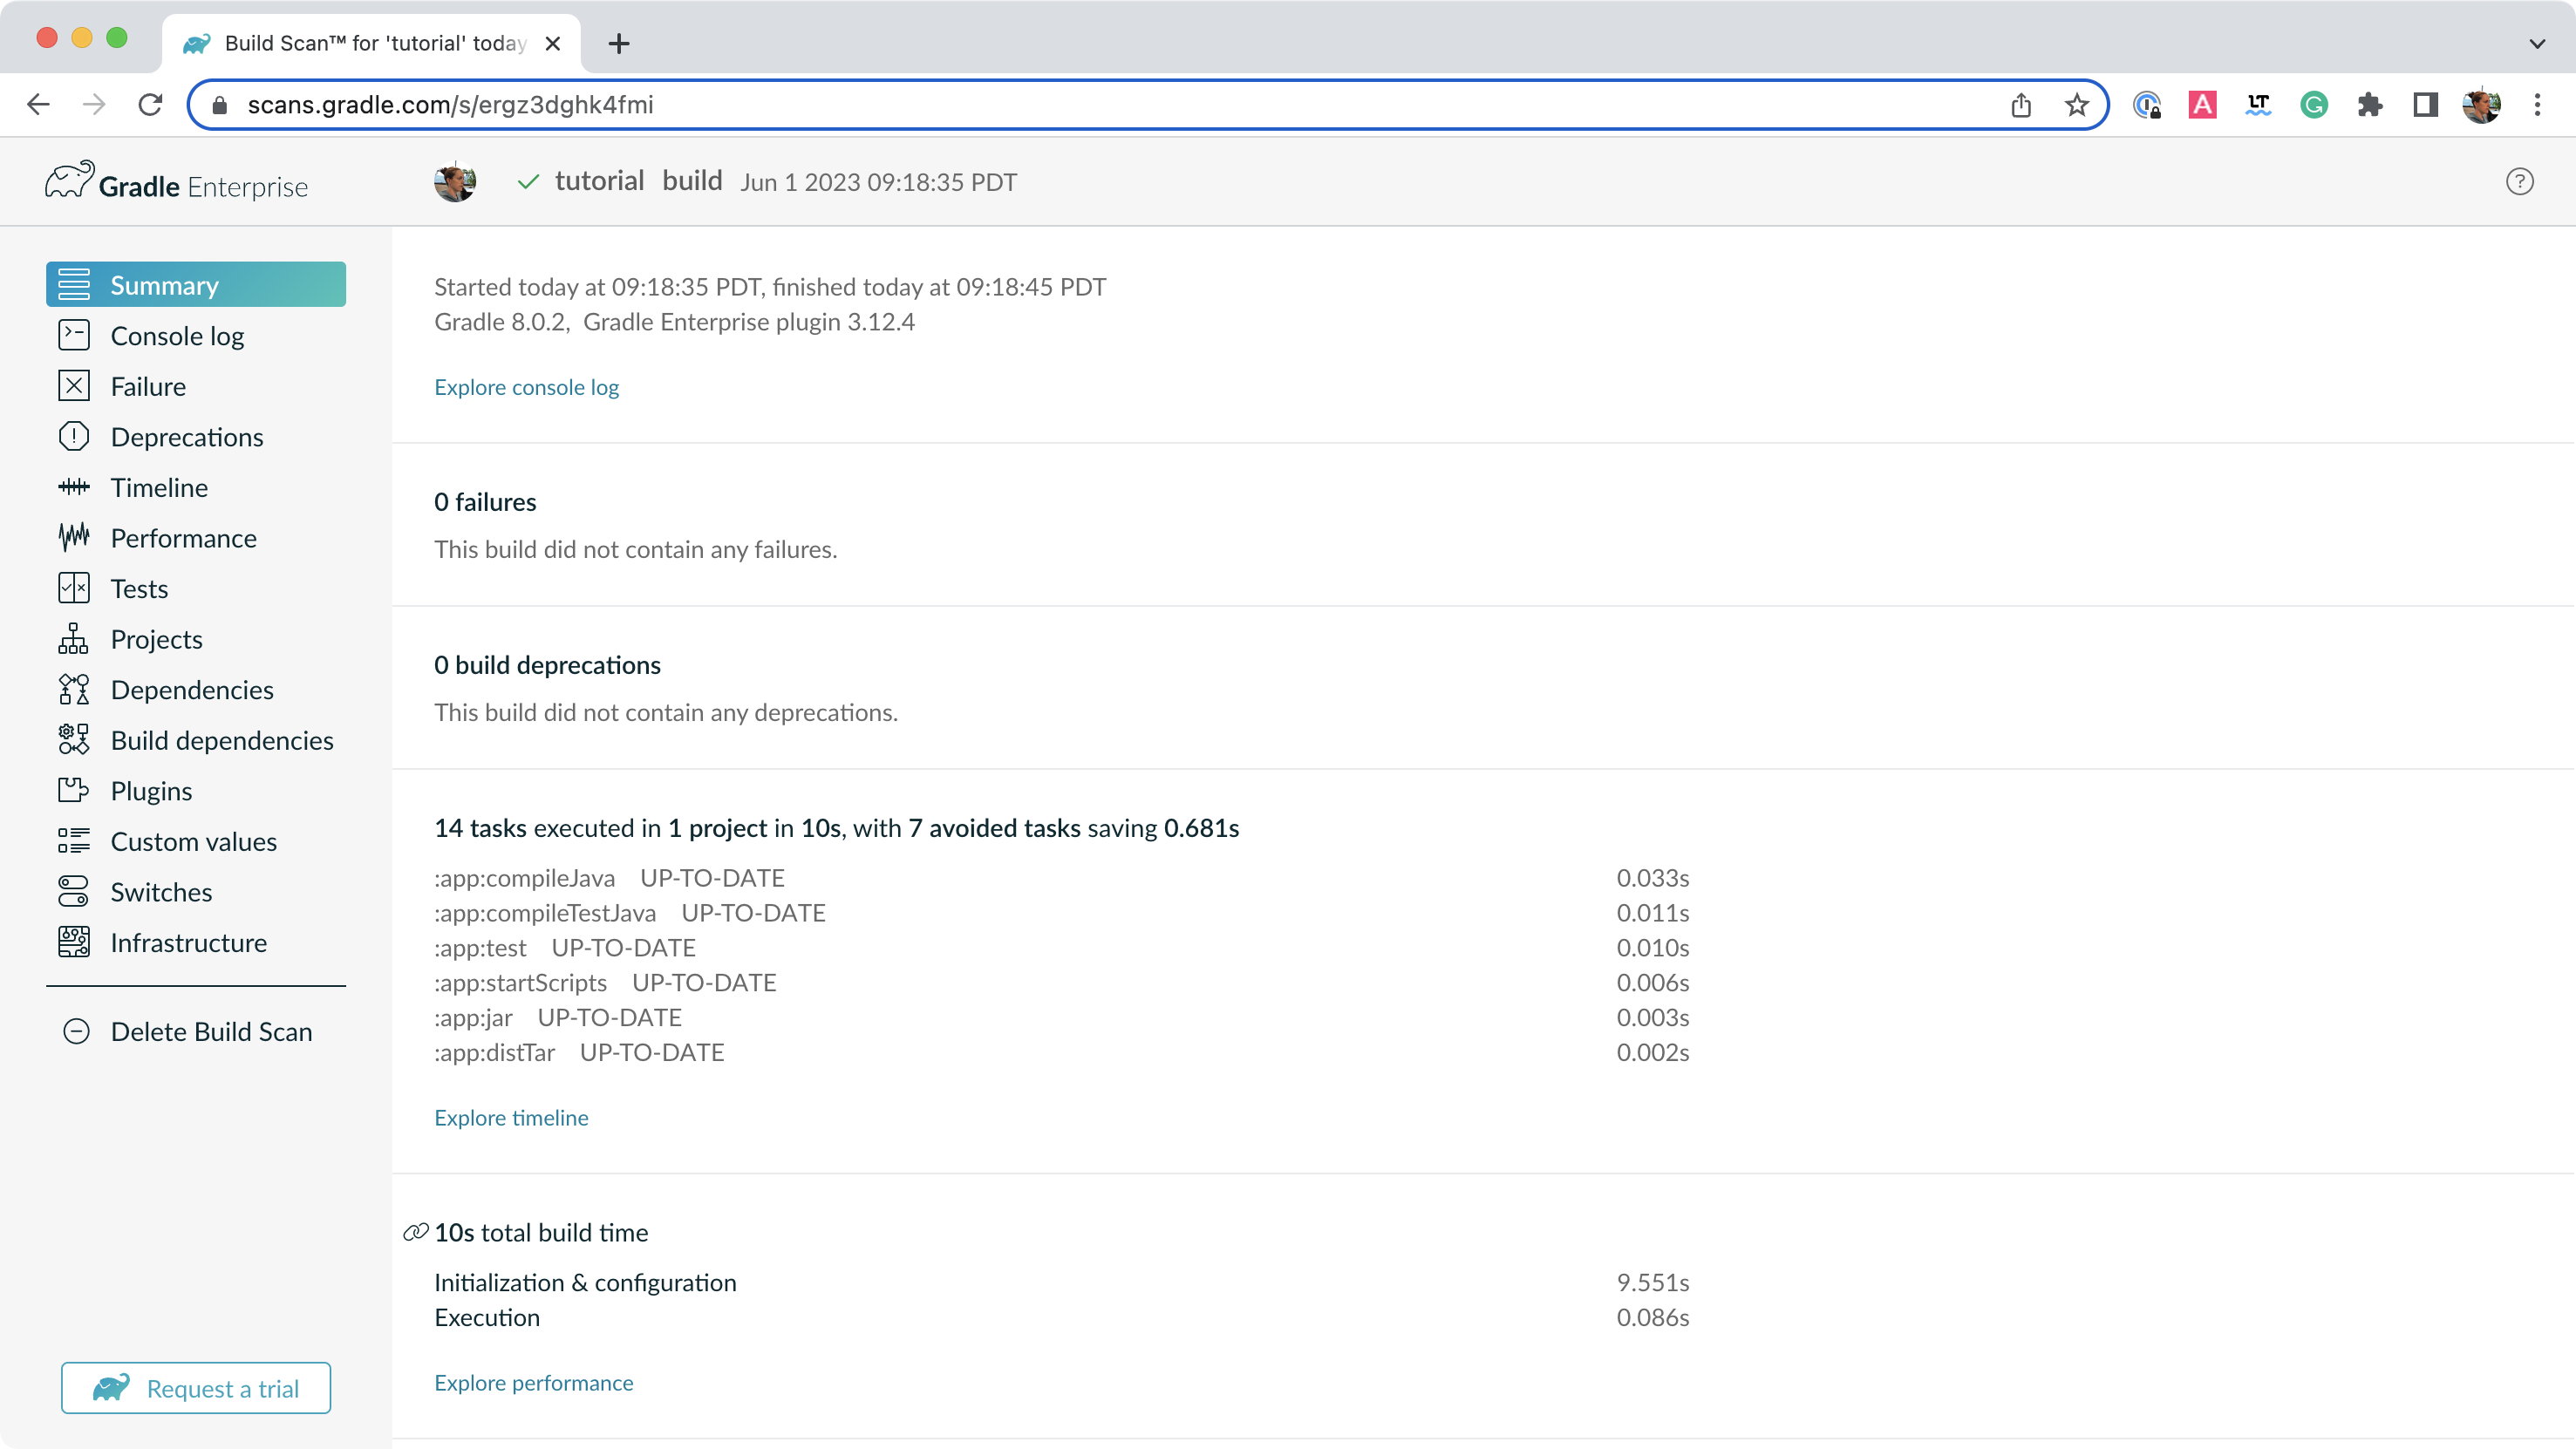
https://gradle.com/s/linkBuild Scan 是 Gradle 提供的免费服务,是可共享和集中的构建记录。
单击提示中提供的链接:https://gradle.com/s/link。
| 您必须接受服务条款才能使用 Build Scan。 |
您需要通过电子邮件激活 Build Scan
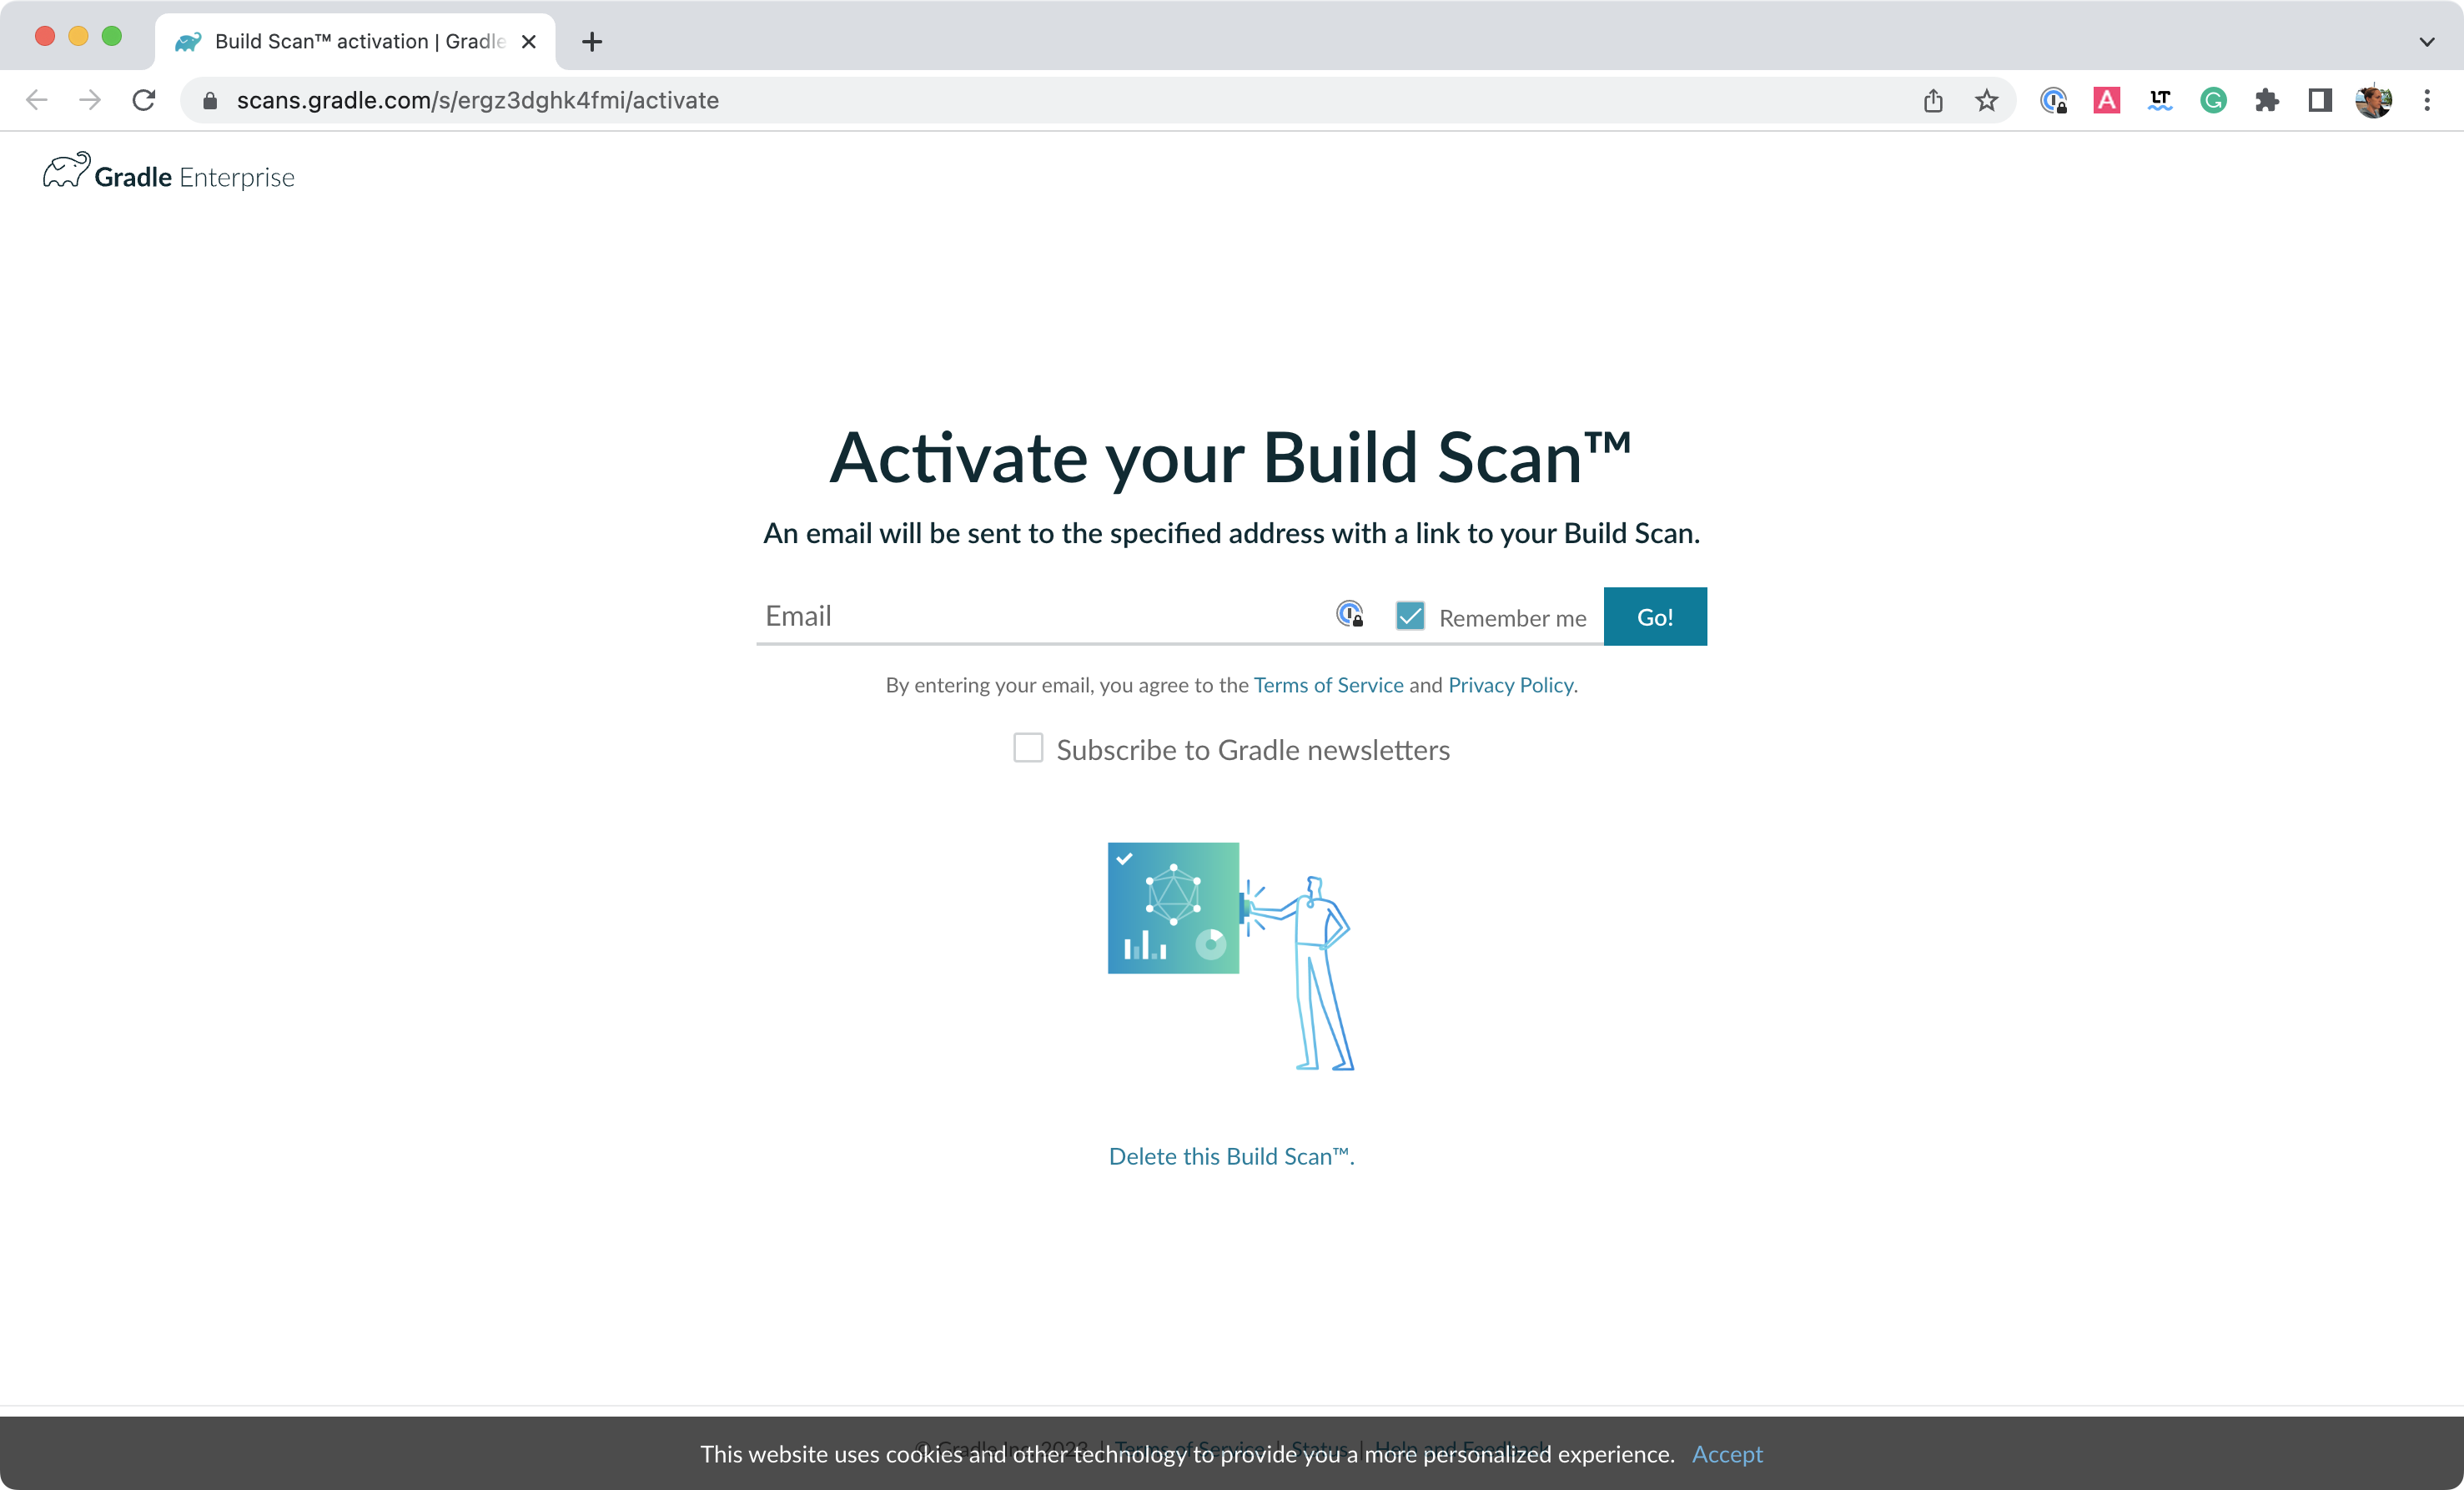
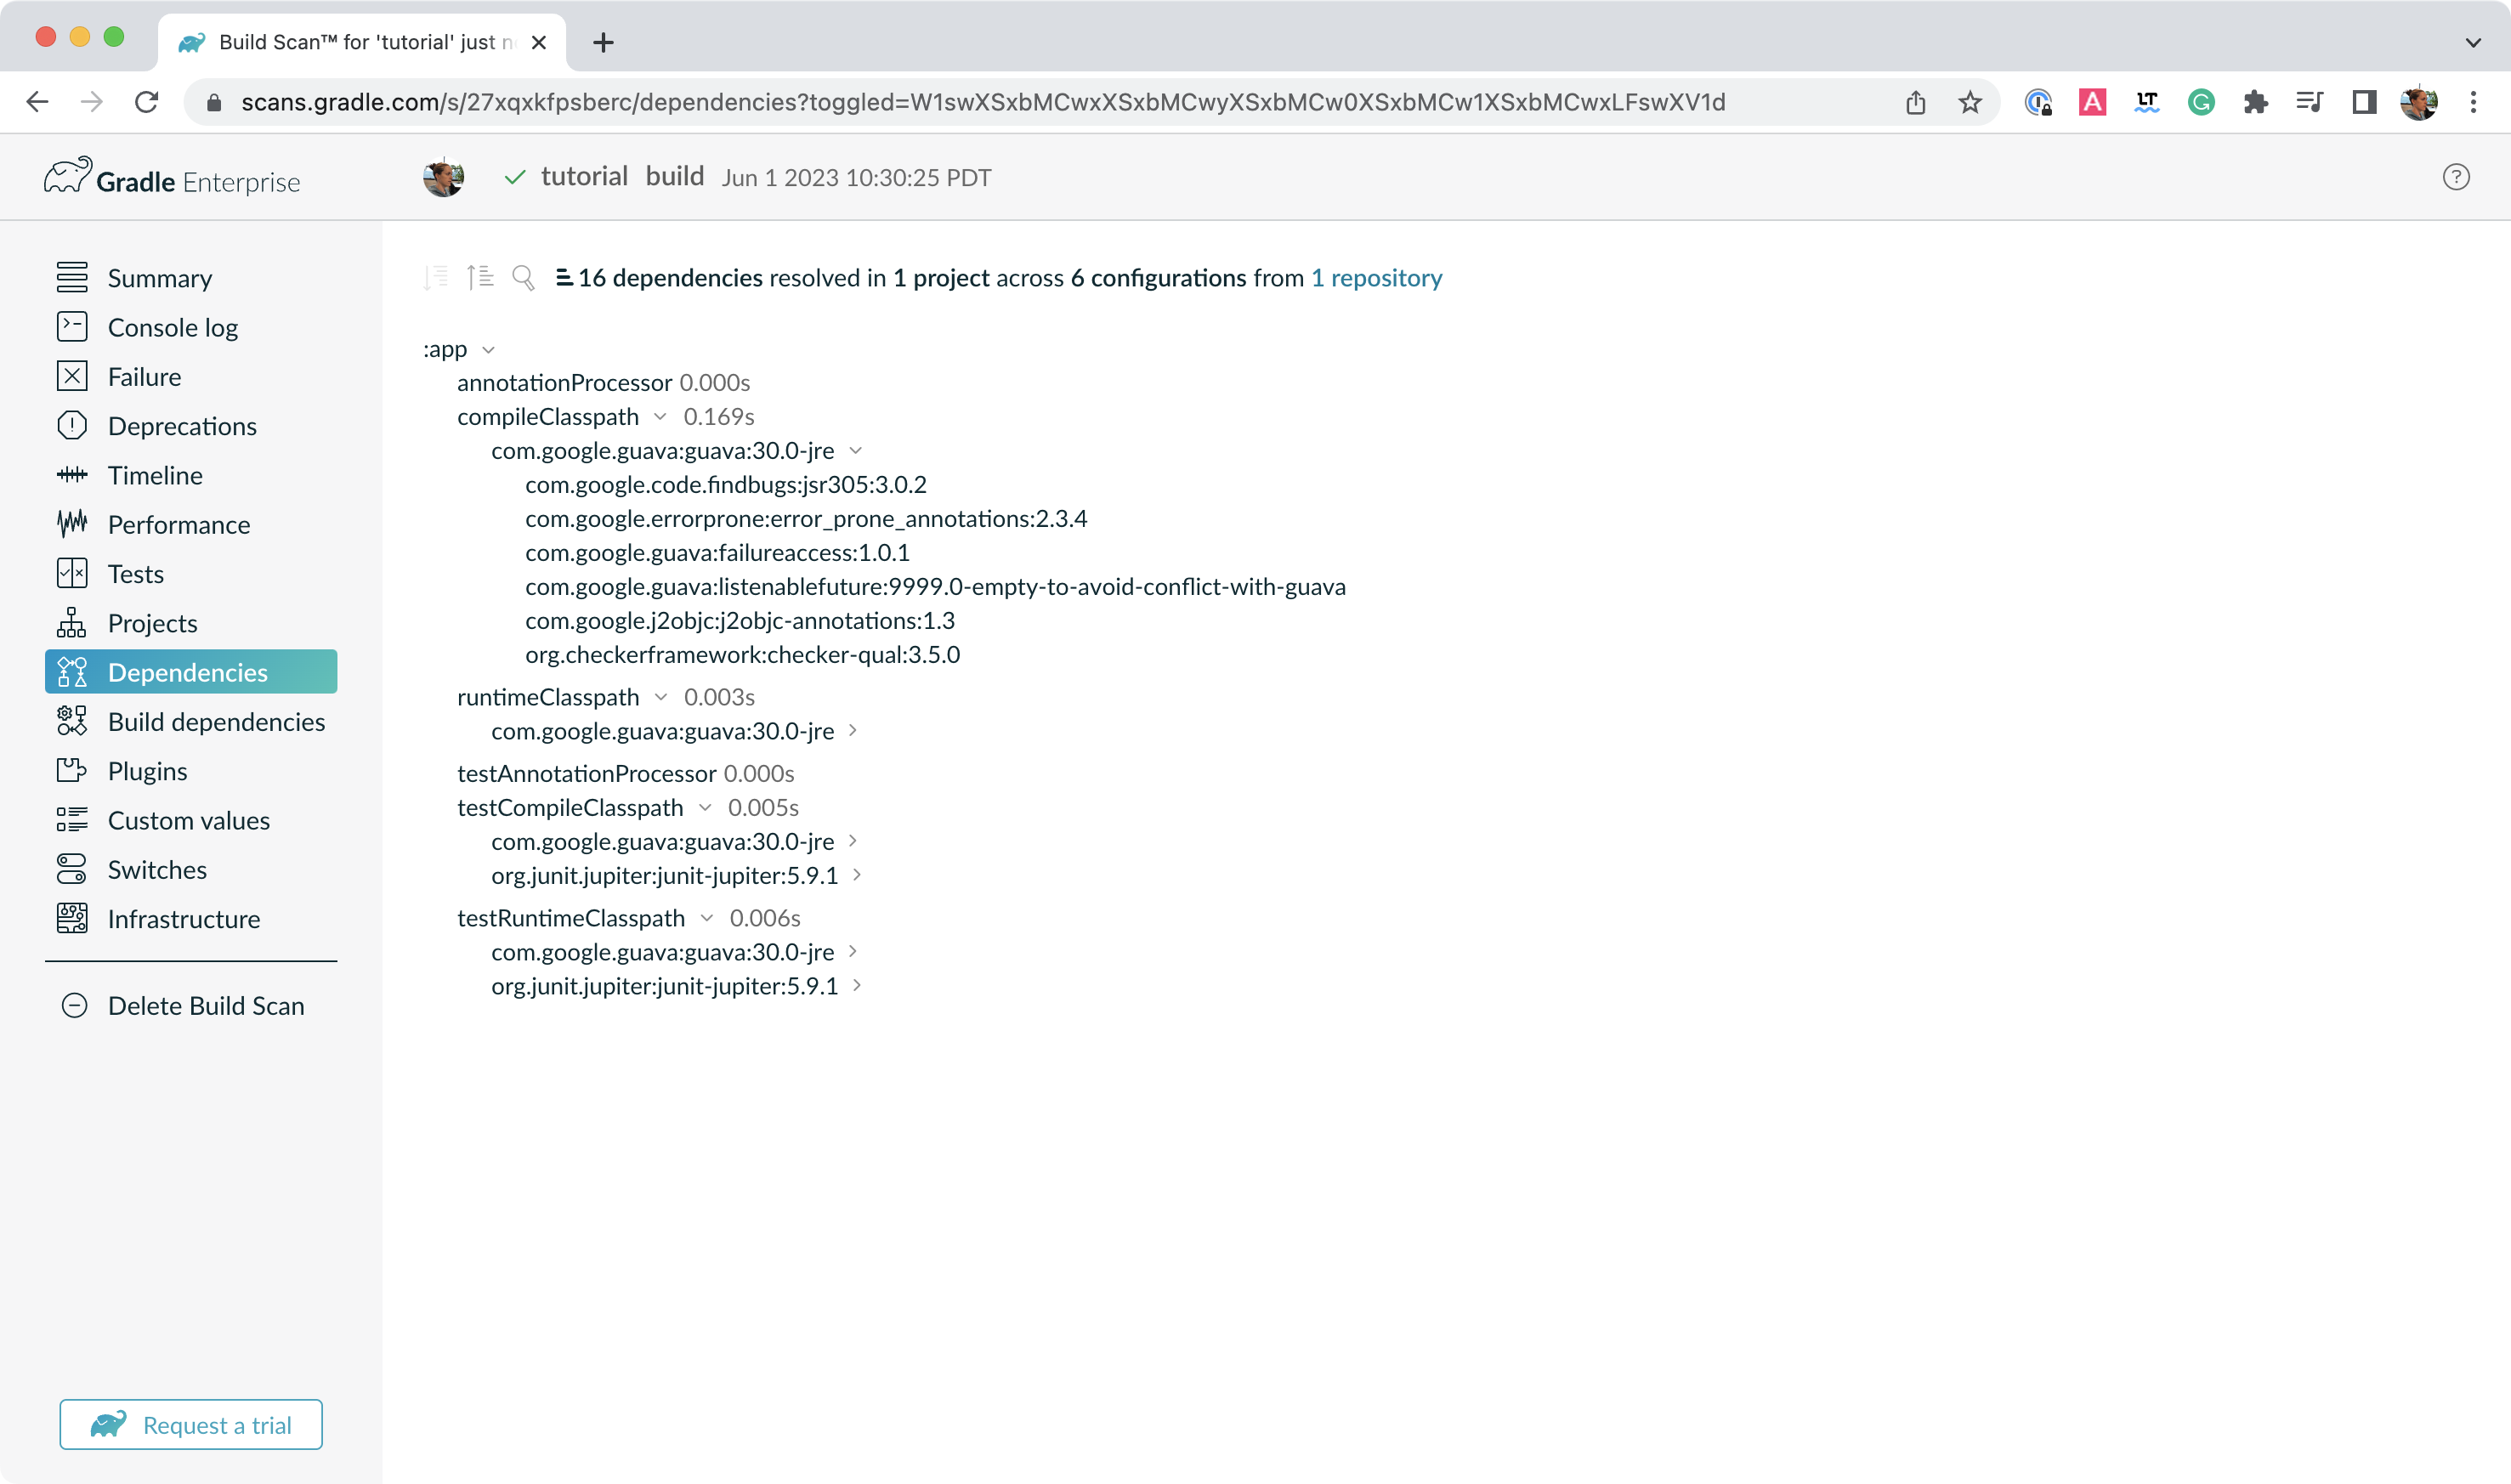
您将收到扫描的最终链接到您的收件箱,该链接应如下所示
打开菜单中的依赖项选项卡,并展开 compileClasspath、runtimeClasspath、testCompileClasspath 和 testRuntimeClasspath
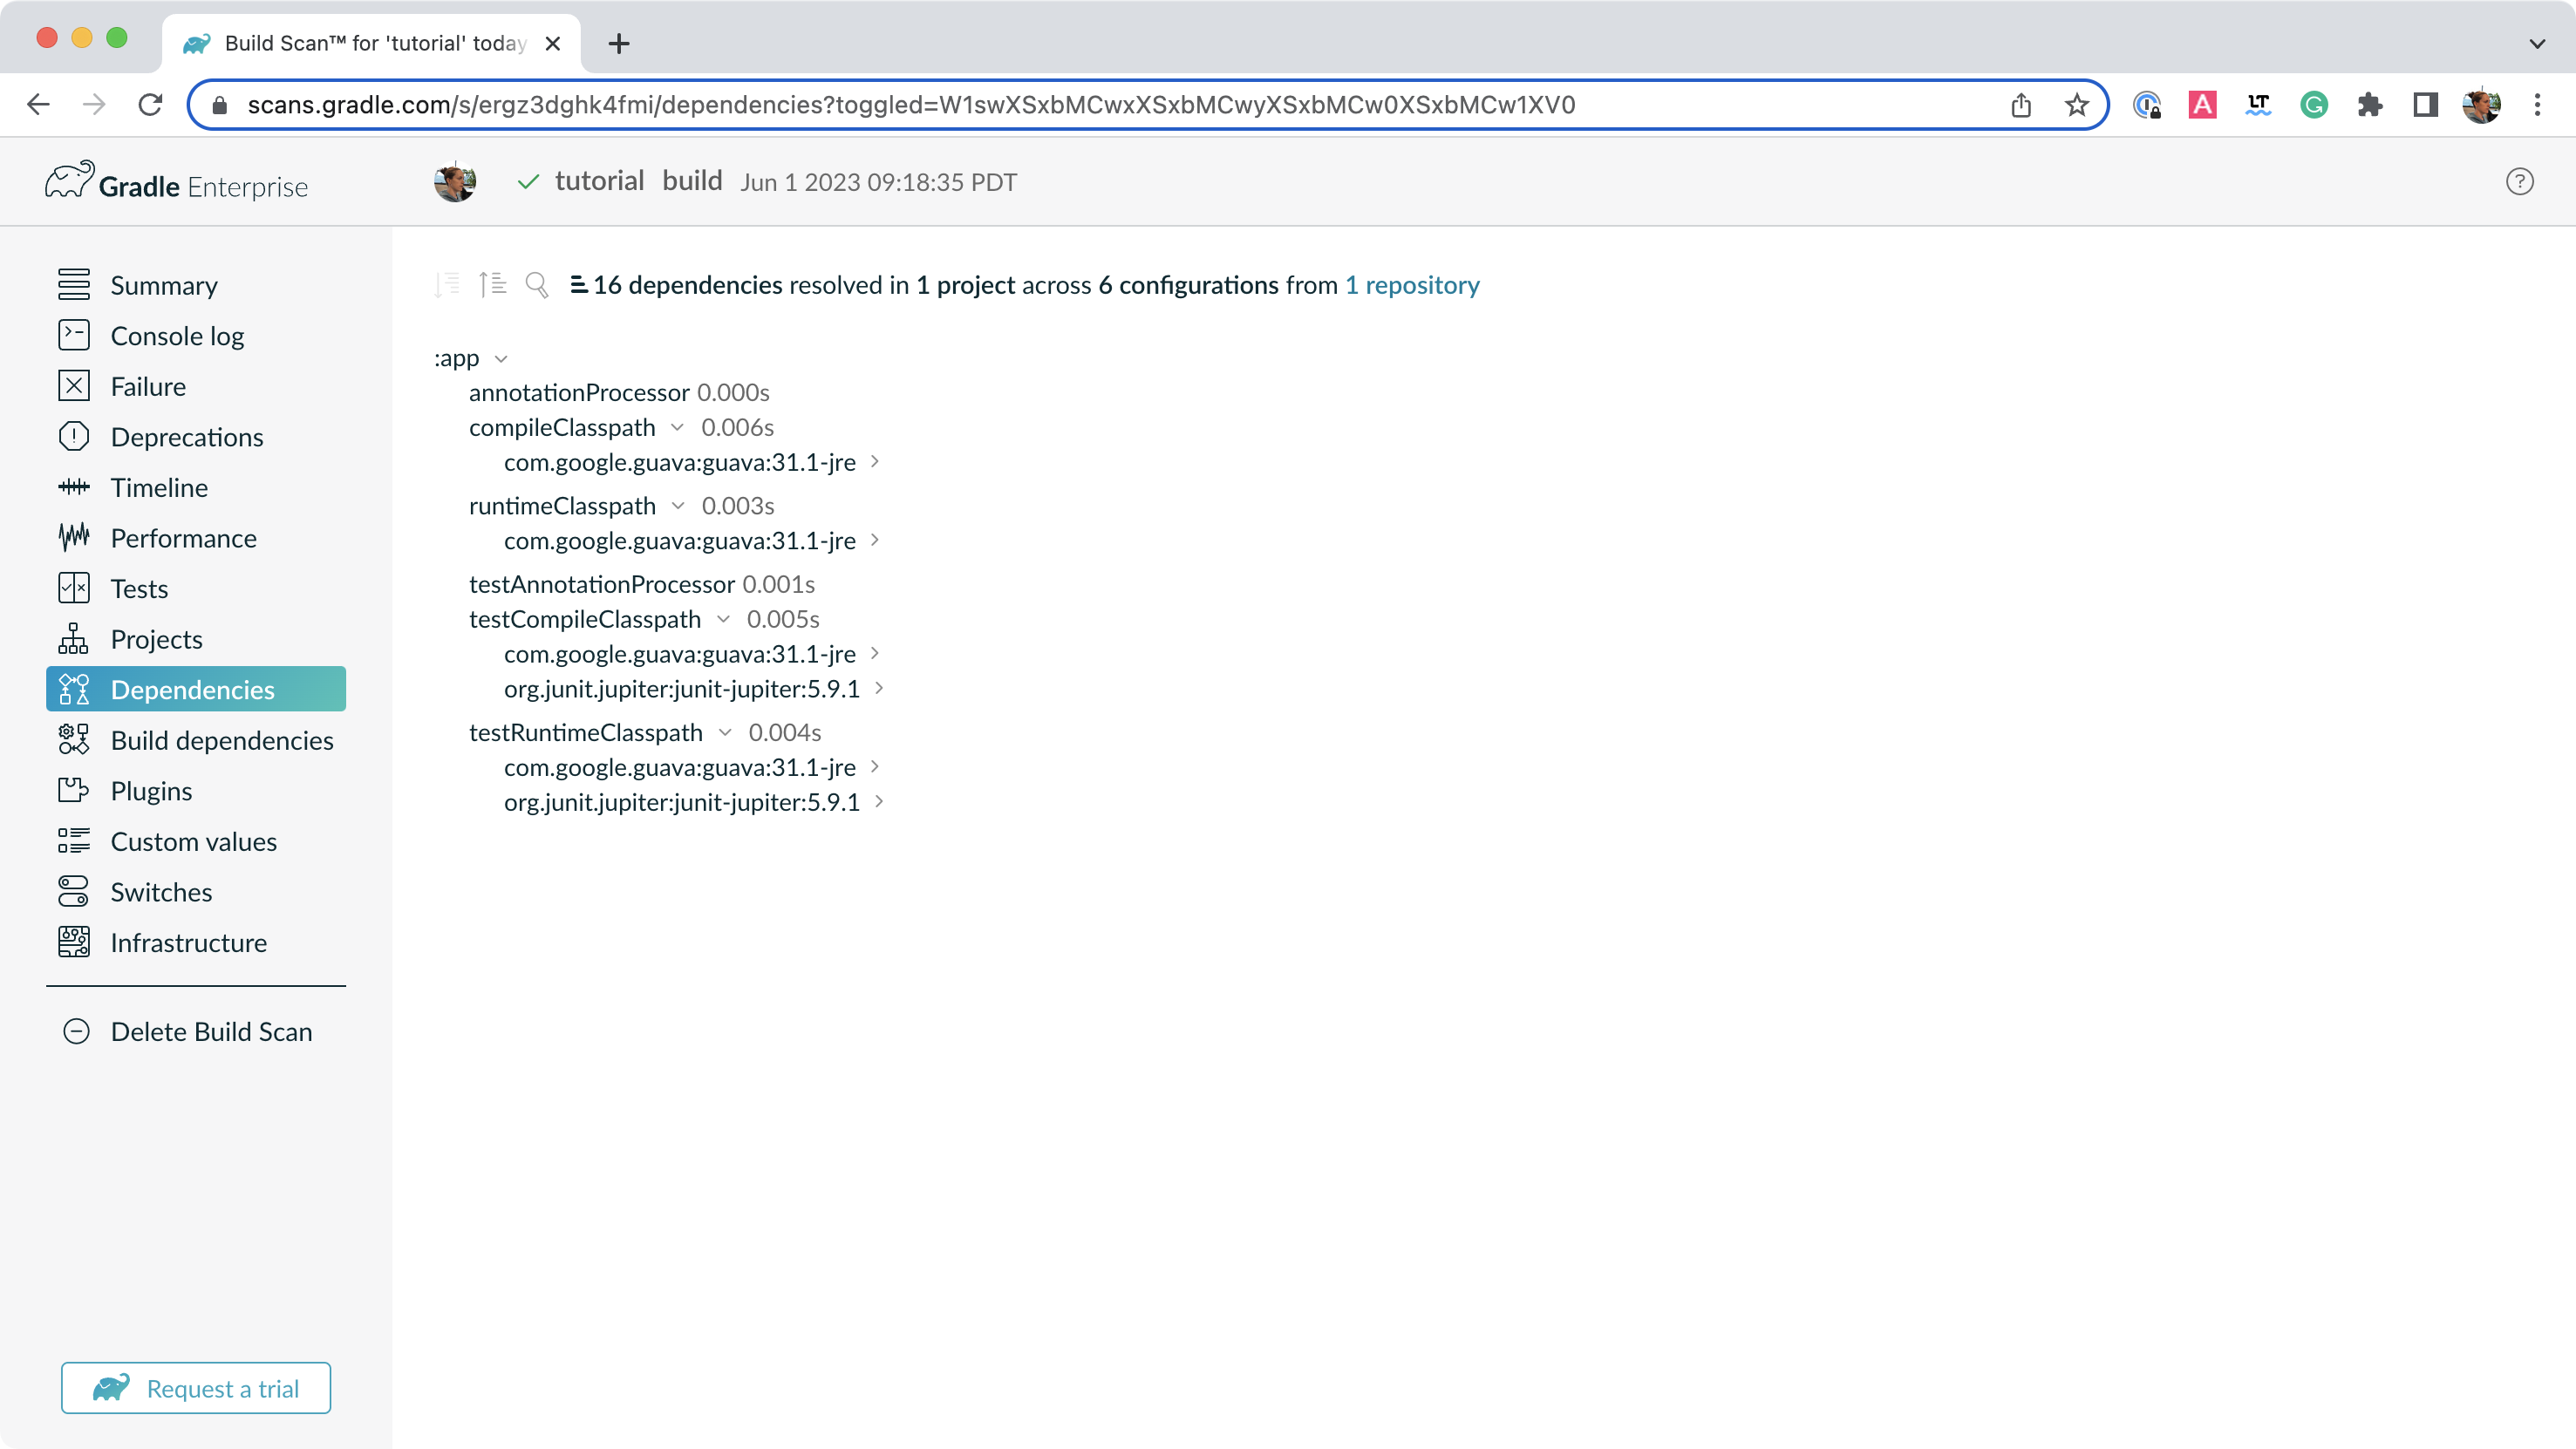
正如预期,我们可以看到 Gradle 使用声明的依赖项 junit 和 guava 来编译、运行和测试应用程序。
在窗口中展开 com.google.guava:guava:33.3.1-jre 和 org.junit.jupiter:junit-jupiter:5.11.3
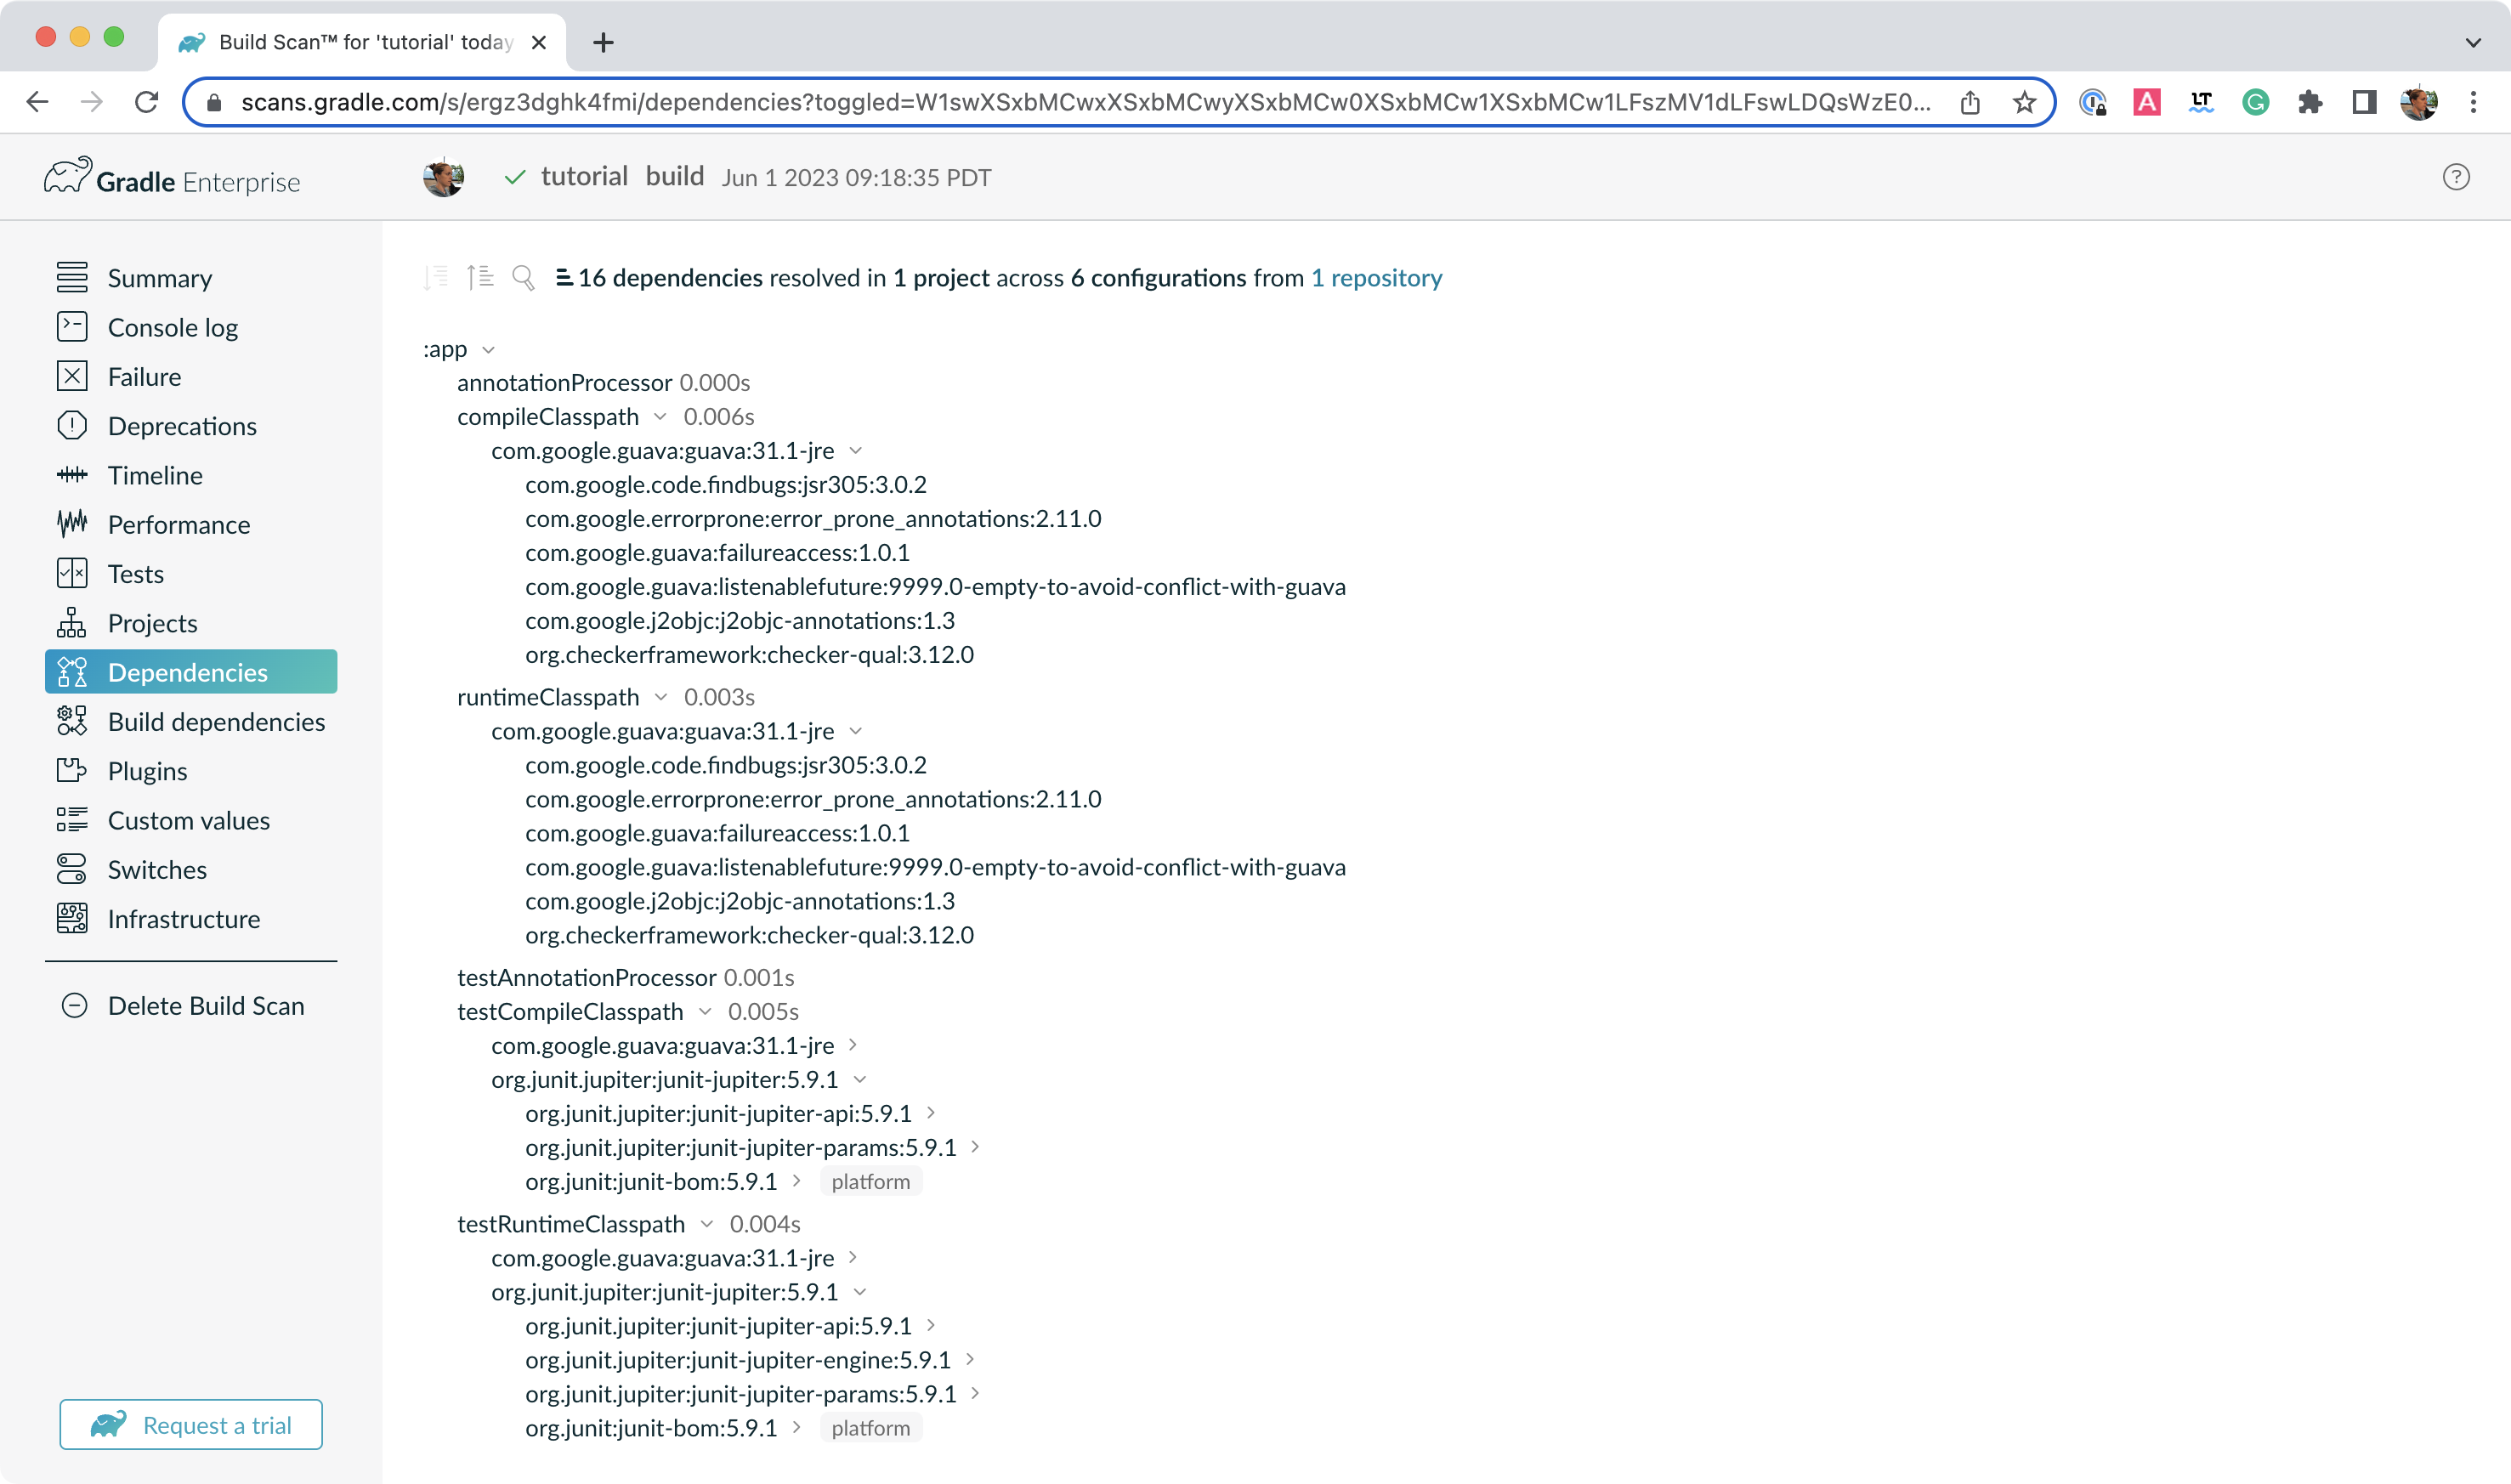
在 junit 和 guava 下有几个传递性依赖。例如,com.google.code.findbugs:jsr305:3.0.2 传递性依赖来自 com.google.guava:guava:33.3.1-jre 依赖。
步骤 6. 更新项目依赖
添加和更改依赖项在构建文件和版本目录中完成。
让我们更改 guava 版本,看看它如何影响依赖树。
将版本目录中的 guava 依赖更改为
[versions]
guava = "30.0-jre"
junit-jupiter = "5.11.3"
[libraries]
guava = { module = "com.google.guava:guava", version.ref = "guava" }
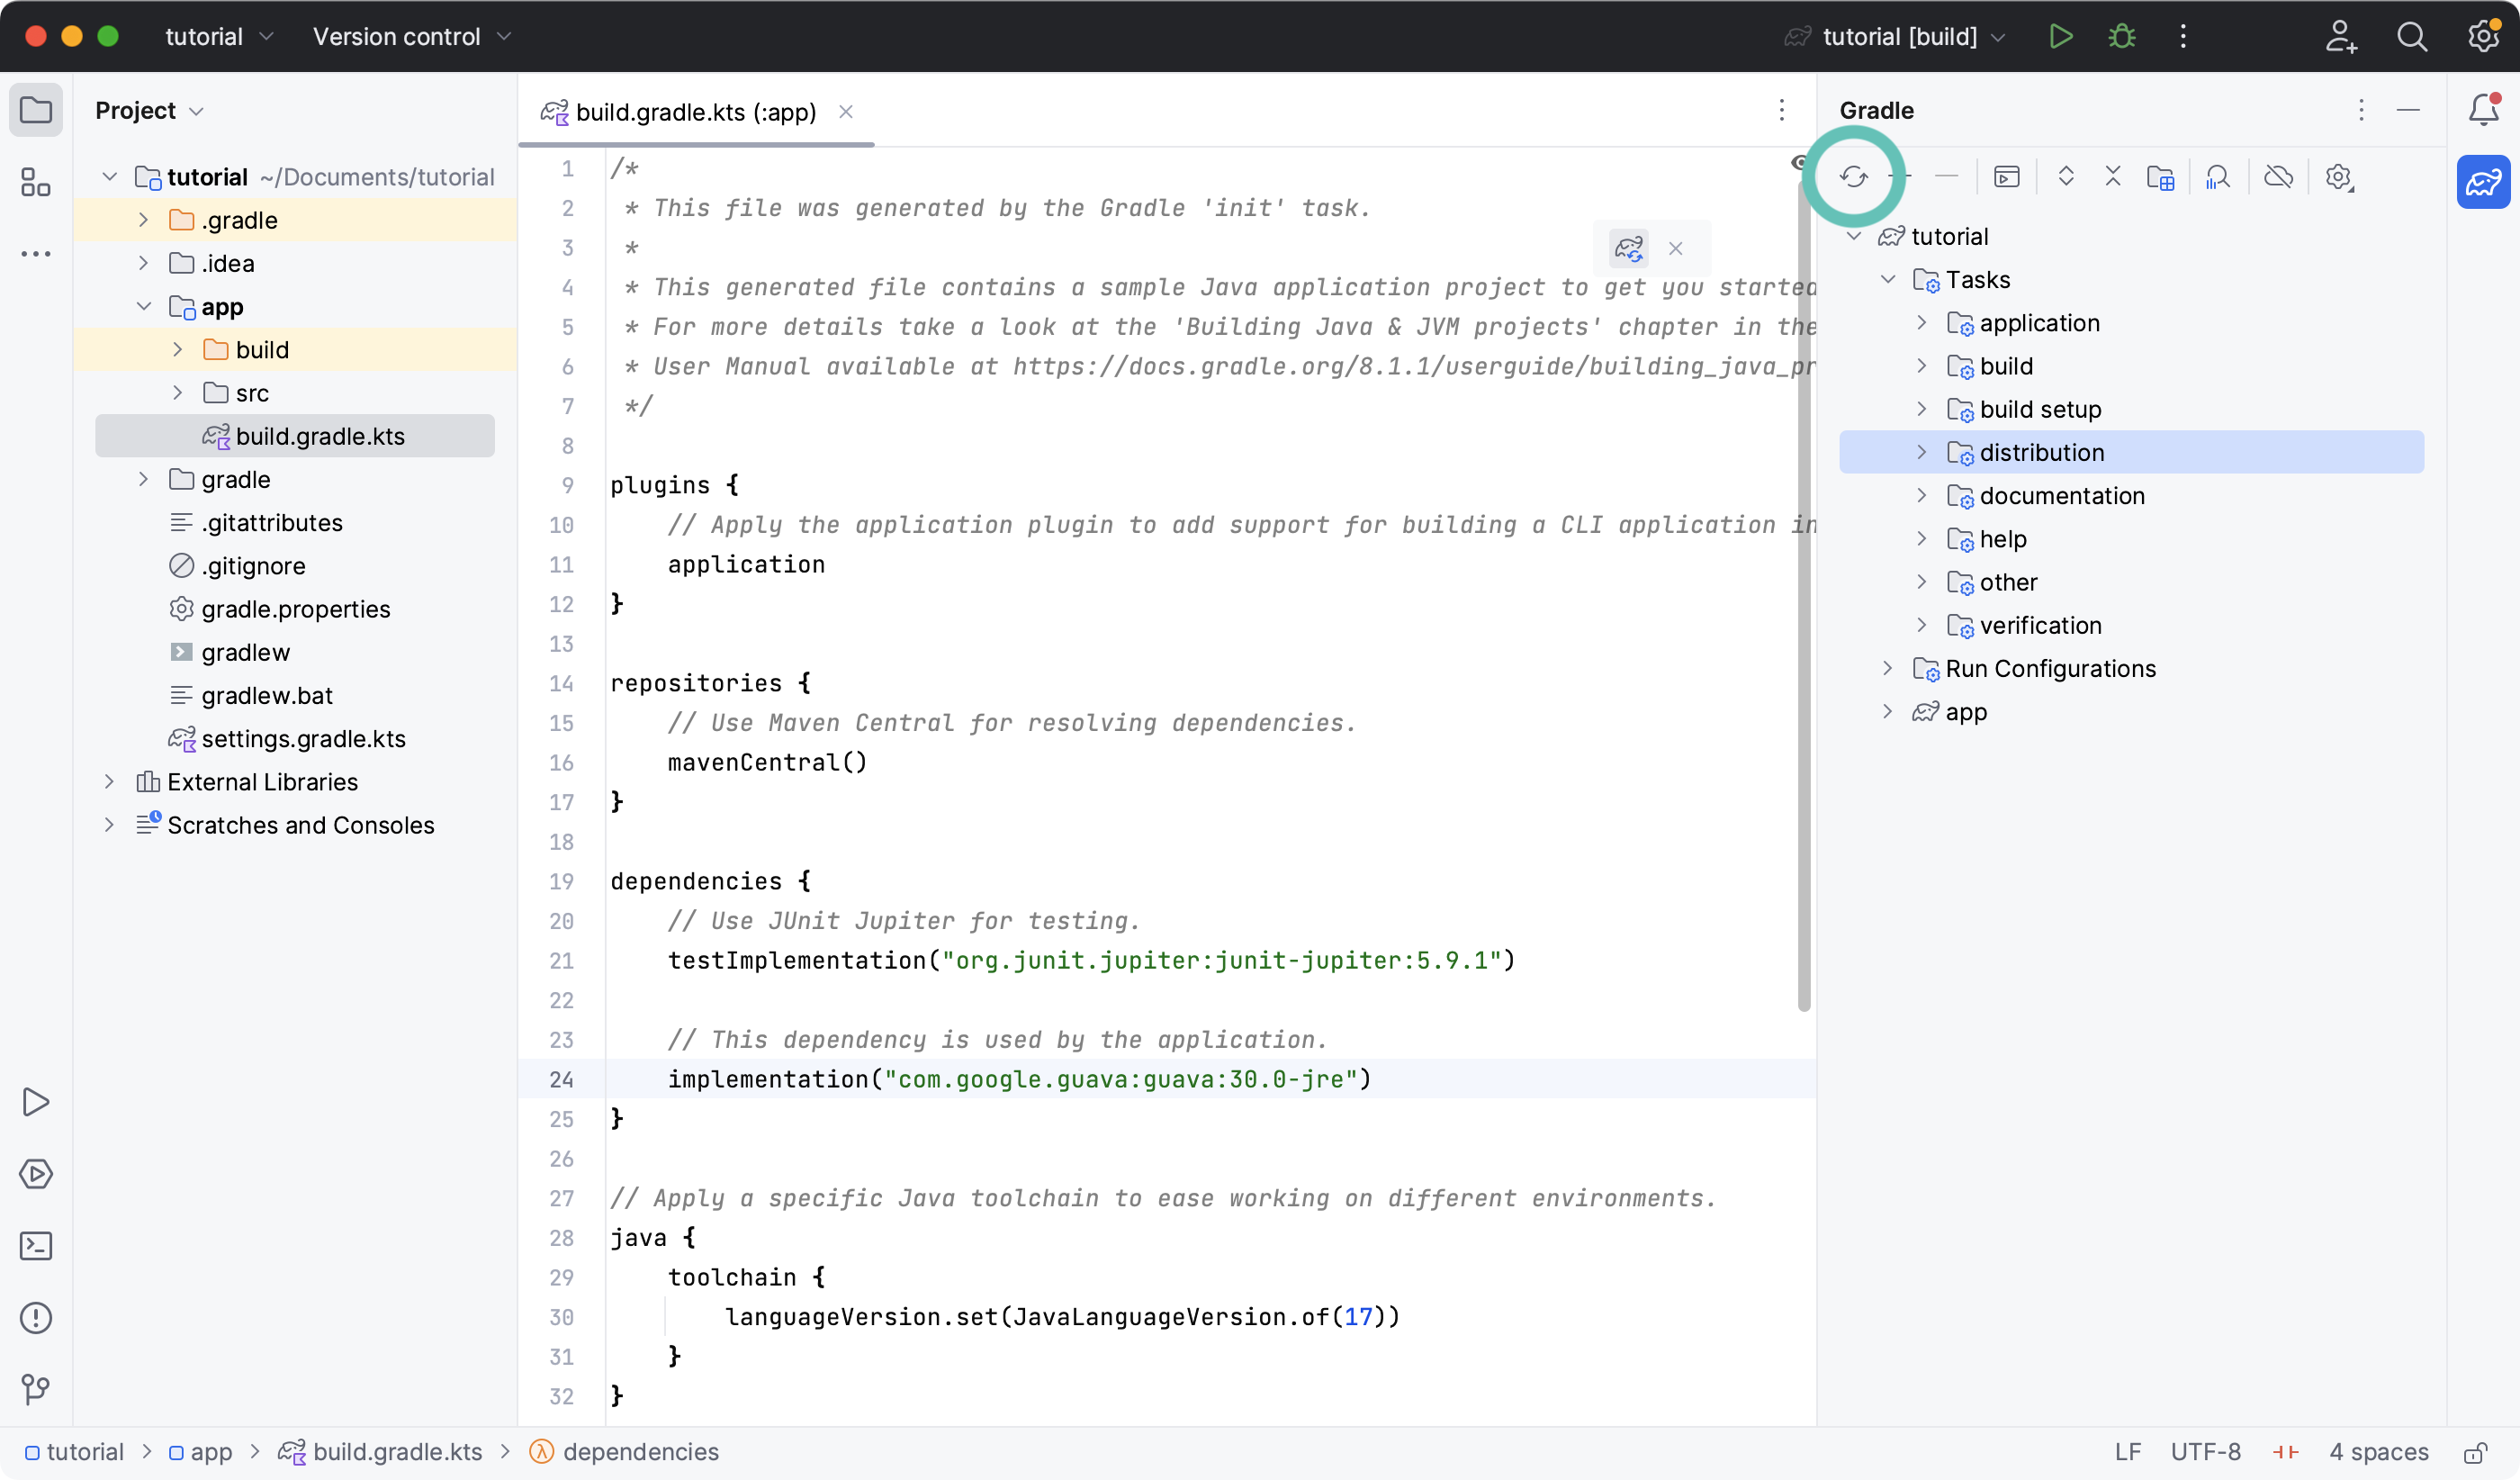
junit-jupiter = { module = "org.junit.jupiter:junit-jupiter", version.ref = "junit-jupiter" }如果您使用 IntelliJ 更改文件,请不要忘记单击 sync Gradle 按钮
运行 ./gradlew build --scan 并查看 Build Scan 结果
在终端中运行 ./gradlew :app:dependencies 以检查依赖树中的更改
...

testRuntimeClasspath - Runtime classpath of source set 'test'.
+--- com.google.guava:guava:30.0-jre
|    +--- com.google.guava:failureaccess:1.0.1
|    +--- com.google.guava:listenablefuture:9999.0-empty-to-avoid-conflict-with-guava
|    +--- com.google.code.findbugs:jsr305:3.0.2
|    +--- org.checkerframework:checker-qual:3.5.0
|    +--- com.google.errorprone:error_prone_annotations:2.3.4
|    \--- com.google.j2objc:j2objc-annotations:1.3
+--- org.junit.jupiter:junit-jupiter:5.11.3
|    +--- org.junit:junit-bom:5.11.3
|    |    +--- org.junit.jupiter:junit-jupiter:5.11.3 (c)
|    |    +--- org.junit.jupiter:junit-jupiter-api:5.11.3 (c)
|    |    +--- org.junit.jupiter:junit-jupiter-engine:5.11.3 (c)
|    |    +--- org.junit.jupiter:junit-jupiter-params:5.11.3 (c)
|    |    +--- org.junit.platform:junit-platform-launcher:1.11.3 (c)
|    |    +--- org.junit.platform:junit-platform-commons:1.11.3 (c)
|    |    \--- org.junit.platform:junit-platform-engine:1.11.3 (c)
|    +--- org.junit.jupiter:junit-jupiter-api:5.11.3
|    |    +--- org.junit:junit-bom:5.11.3 (*)
|    |    +--- org.opentest4j:opentest4j:1.3.0
|    |    \--- org.junit.platform:junit-platform-commons:1.11.3
|    |         \--- org.junit:junit-bom:5.11.3 (*)
|    +--- org.junit.jupiter:junit-jupiter-params:5.11.3
|    |    +--- org.junit:junit-bom:5.11.3 (*)
|    |    \--- org.junit.jupiter:junit-jupiter-api:5.11.3 (*)
|    \--- org.junit.jupiter:junit-jupiter-engine:5.11.3
|         +--- org.junit:junit-bom:5.11.3 (*)
|         +--- org.junit.platform:junit-platform-engine:1.11.3
|         |    +--- org.junit:junit-bom:5.11.3 (*)
|         |    +--- org.opentest4j:opentest4j:1.3.0
|         |    \--- org.junit.platform:junit-platform-commons:1.11.3 (*)
|         \--- org.junit.jupiter:junit-jupiter-api:5.11.3 (*)
\--- org.junit.platform:junit-platform-launcher -> 1.11.3
     +--- org.junit:junit-bom:5.11.3 (*)
\--- org.junit.platform:junit-platform-engine:1.11.3 (*)很明显,guava 依赖已更新到版本 30.0,并且传递性依赖也发生了变化。
步骤 7. 运行 Java 应用程序
最后,确保一切正常,使用 run 任务,无论是在您的终端还是 IDE 中
./gradlew run

> Task :app:compileJava UP-TO-DATE
> Task :app:processResources NO-SOURCE
> Task :app:classes UP-TO-DATE

> Task :app:run
Hello World!
下一步: 应用插件 >>