测试在开发过程中扮演着至关重要的角色,它确保了软件的可靠性和高质量。这一原则同样适用于构建代码,包括 Gradle 插件。
示例项目
本节围绕一个名为“URL 验证器插件”的示例项目展开。这个插件创建了一个名为 verifyUrl 的任务,用于检查给定 URL 是否可以通过 HTTP GET 解析。最终用户可以通过名为 verification 的扩展提供 URL。
以下构建脚本假设插件 JAR 文件已发布到二进制仓库。该脚本演示了如何将插件应用于项目并配置其暴露的扩展。
plugins {
    id("org.myorg.url-verifier")        (1)
}

verification {
    url = "https://www.google.com/"  (2)
}plugins {
id 'org.myorg.url-verifier' (1)
}
verification {
url = 'https://www.google.com/' (2)
}| 1 | 将插件应用于项目 |
| 2 | 通过暴露的扩展配置要验证的 URL |
如果对配置的 URL 执行 HTTP GET 调用返回 200 响应码,则执行 verifyUrl 任务会显示成功消息。
$ gradle verifyUrl

> Task :verifyUrl
Successfully resolved URL 'https://www.google.com/'

BUILD SUCCESSFUL in 0s
5 actionable tasks: 5 executed
在深入研究代码之前,让我们首先回顾不同类型的测试以及支持实现它们的工具。
测试的重要性
测试是软件开发生命周期中至关重要的一部分,它确保软件在发布前功能正常并符合质量标准。自动化测试使开发人员能够自信地重构和改进代码。
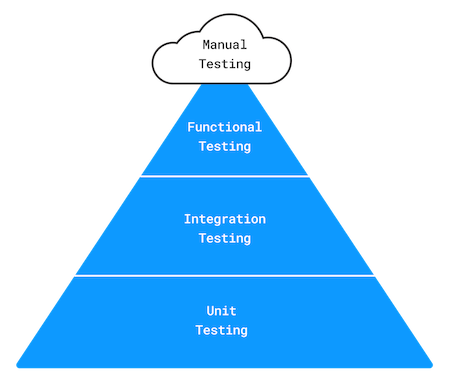
测试金字塔
- 手动测试
-
虽然手动测试很简单,但它容易出错且需要人工。对于 Gradle 插件,手动测试涉及在构建脚本中使用插件。
- 自动化测试
-
自动化测试包括单元测试、集成测试和功能测试。

Mike Cohen 在其著作 《Succeeding with Agile: Software Development Using Scrum》 中介绍了测试金字塔,它描述了三种类型的自动化测试:
-
单元测试: 独立验证最小的代码单元,通常是方法。它使用存根(Stubs)或模拟(Mocks)将代码与外部依赖隔离。
-
集成测试: 验证多个单元或组件协同工作。
-
功能测试: 从最终用户的角度测试系统,确保功能正确。Gradle 插件的端到端测试模拟构建、应用插件并执行特定任务以验证功能。
工具支持
使用适当的工具,手动和自动测试 Gradle 插件都变得简单。下表总结了每种测试方法。您可以选择任何您熟悉的测试框架。
有关详细解释和代码示例,请参阅下面的具体章节。
| 测试类型 | 工具支持 |
|---|---|
任何基于 JVM 的测试框架 |
|
任何基于 JVM 的测试框架 |
|
任何基于 JVM 的测试框架和 Gradle TestKit |
设置手动测试
Gradle 的 复合构建 功能使得手动测试插件变得容易。独立的插件项目和消费项目可以组合成一个单元,从而无需重新发布二进制文件即可轻松尝试或调试更改。
.
├── include-plugin-build   (1)
│   ├── build.gradle
│   └── settings.gradle
└── url-verifier-plugin    (2)
    ├── build.gradle
    ├── settings.gradle
    └── src
| 1 | 包含插件项目的消费项目 |
| 2 | 插件项目 |
有两种方法可以将插件项目包含在消费项目中:
-
使用命令行选项
--include-build。 -
使用
settings.gradle中的includeBuild方法。
以下代码片段演示了 settings 文件的使用:
pluginManagement {
    includeBuild("../url-verifier-plugin")
}pluginManagement {
includeBuild '../url-verifier-plugin'
}来自项目 include-plugin-build 的 verifyUrl 任务的命令行输出 与引言中显示的一模一样,只是它现在作为复合构建的一部分执行。
手动测试在开发过程中有其作用,但它不能替代自动化测试。
设置自动化测试
尽早建立一套测试对于插件的成功至关重要。当将插件升级到新的 Gradle 版本或增强/重构代码时,自动化测试将成为宝贵的安全网。
组织测试源代码
我们建议对单元测试、集成测试和功能测试进行良好分布,以覆盖最重要的用例。分离每种测试类型的源代码会自动使项目更易于维护和管理。
默认情况下,Java 项目创建了一个用于在 src/test/java 目录中组织单元测试的约定。此外,如果您应用 Groovy 插件,src/test/groovy 目录下的源代码将被考虑编译(Kotlin 在 src/test/kotlin 目录下也有相同的标准)。因此,其他测试类型的源代码目录应遵循类似的模式:
.
└── src
    ├── functionalTest
    │   └── groovy      (1)
    ├── integrationTest
    │   └── groovy      (2)
    ├── main
    │   ├── java        (3)
    └── test
        └── groovy      (4)
| 1 | 包含功能测试的源目录 |
| 2 | 包含集成测试的源目录 |
| 3 | 包含生产源代码的源目录 |
| 4 | 包含单元测试的源目录 |
src/integrationTest/groovy 和 src/functionalTest/groovy 目录并非基于 Gradle 项目的现有标准约定。您可以自由选择最适合您的项目布局。 |
您可以配置用于编译和测试执行的源目录。
测试套件插件 提供 DSL 和 API,用于在基于 JVM 的项目中将多组自动化测试建模为测试套件。您也可以依赖第三方插件以方便,例如 Nebula Facet 插件 或 TestSets 插件。
建模测试类型
通过孵化中的 JVM 测试套件 插件,可以使用新的配置 DSL 来建模下面的 integrationTest 套件。 |
在 Gradle 中,源代码目录使用 源集 的概念来表示。源集被配置为指向一个或多个包含源代码的目录。当您定义源集时,Gradle 会自动为指定的目录设置编译任务。
只需一行构建脚本代码即可创建预配置的源集。源集会自动注册配置,以定义源集源代码的依赖项。
// Define a source set named 'test' for test sources
sourceSets {
    test {
        java {
            srcDirs = ['src/test/java']
        }
    }
}
// Specify a test implementation dependency on JUnit
dependencies {
    testImplementation 'junit:junit:4.12'
}
我们使用它来定义对项目本身的 integrationTestImplementation 依赖项,它代表我们项目的“主”变体(即编译后的插件代码)。
val integrationTest by sourceSets.creating

dependencies {
    "integrationTestImplementation"(project)
}def integrationTest = sourceSets.create("integrationTest")
dependencies {
integrationTestImplementation(project)
}源集负责编译源代码,但不处理字节码的执行。对于测试执行,需要建立一个相应类型的 Test 任务。以下设置展示了集成测试的执行,引用了集成测试源集的类和运行时类路径。
val integrationTestTask = tasks.register<Test>("integrationTest") {
    description = "Runs the integration tests."
    group = "verification"
    testClassesDirs = integrationTest.output.classesDirs
    classpath = integrationTest.runtimeClasspath
    mustRunAfter(tasks.test)
}
tasks.check {
    dependsOn(integrationTestTask)
}def integrationTestTask = tasks.register("integrationTest", Test) {
description = 'Runs the integration tests.'
group = "verification"
testClassesDirs = integrationTest.output.classesDirs
classpath = integrationTest.runtimeClasspath
mustRunAfter(tasks.named('test'))
}
tasks.named('check') {
dependsOn(integrationTestTask)
}配置测试框架
以下代码片段演示了如何使用 Spock 实现测试:
repositories {
    mavenCentral()
}

dependencies {
    testImplementation(platform("org.spockframework:spock-bom:2.3-groovy-4.0"))
    testImplementation("org.spockframework:spock-core")
    testRuntimeOnly("org.junit.platform:junit-platform-launcher")

    "integrationTestImplementation"(platform("org.spockframework:spock-bom:2.3-groovy-4.0"))
    "integrationTestImplementation"("org.spockframework:spock-core")
    "integrationTestRuntimeOnly"("org.junit.platform:junit-platform-launcher")

    "functionalTestImplementation"(platform("org.spockframework:spock-bom:2.3-groovy-4.0"))
    "functionalTestImplementation"("org.spockframework:spock-core")
    "functionalTestRuntimeOnly"("org.junit.platform:junit-platform-launcher")
}

tasks.withType<Test>().configureEach {
    // Using JUnitPlatform for running tests
    useJUnitPlatform()
}repositories {
mavenCentral()
}
dependencies {
testImplementation platform("org.spockframework:spock-bom:2.3-groovy-4.0")
testImplementation 'org.spockframework:spock-core'
testRuntimeOnly 'org.junit.platform:junit-platform-launcher'
integrationTestImplementation platform("org.spockframework:spock-bom:2.3-groovy-4.0")
integrationTestImplementation 'org.spockframework:spock-core'
integrationTestRuntimeOnly 'org.junit.platform:junit-platform-launcher'
functionalTestImplementation platform("org.spockframework:spock-bom:2.3-groovy-4.0")
functionalTestImplementation 'org.spockframework:spock-core'
functionalTestRuntimeOnly 'org.junit.platform:junit-platform-launcher'
}
tasks.withType(Test).configureEach {
// Using JUnitPlatform for running tests
useJUnitPlatform()
}| Spock 是一个基于 Groovy 的 BDD 测试框架,甚至包含用于创建存根和模拟的 API。Gradle 团队偏爱 Spock,因为它具有表达性和简洁性。 |
实现自动化测试
本节讨论单元测试、集成测试和功能测试的代表性实现示例。所有测试类都基于 Spock 的使用,尽管将代码适应不同的测试框架应该相对容易。
实现单元测试
URL 验证器插件发出 HTTP GET 调用,以检查 URL 是否可以成功解析。方法 DefaultHttpCaller.get(String) 负责调用给定 URL 并返回 HttpResponse 类型实例。HttpResponse 是一个包含 HTTP 响应代码和消息信息的 POJO。
package org.myorg.http;

public class HttpResponse {
    private int code;
    private String message;

    public HttpResponse(int code, String message) {
        this.code = code;
        this.message = message;
    }

    public int getCode() {
        return code;
    }

    public String getMessage() {
        return message;
    }

    @Override
    public String toString() {
        return "HTTP " + code + ", Reason: " + message;
    }
}
HttpResponse 类非常适合进行单元测试。它不依赖任何其他类,也不使用 Gradle API。
package org.myorg.http

import spock.lang.Specification

class HttpResponseTest extends Specification {

    private static final int OK_HTTP_CODE = 200
    private static final String OK_HTTP_MESSAGE = 'OK'

    def "can access information"() {
        when:
        def httpResponse = new HttpResponse(OK_HTTP_CODE, OK_HTTP_MESSAGE)

        then:
        httpResponse.code == OK_HTTP_CODE
        httpResponse.message == OK_HTTP_MESSAGE
    }

    def "can get String representation"() {
        when:
        def httpResponse = new HttpResponse(OK_HTTP_CODE, OK_HTTP_MESSAGE)

        then:
        httpResponse.toString() == "HTTP $OK_HTTP_CODE, Reason: $OK_HTTP_MESSAGE"
    }
}| 在编写单元测试时,测试边界条件和各种形式的无效输入非常重要。尽量从使用 Gradle API 的类中提取尽可能多的逻辑,以便将其作为单元测试进行测试。这将带来可维护的代码和更快的测试执行。 |
您可以使用 ProjectBuilder 类来创建 Project 实例,以便在测试插件实现时使用。
public class GreetingPluginTest {
    @Test
    public void greeterPluginAddsGreetingTaskToProject() {
        Project project = ProjectBuilder.builder().build();
        project.getPluginManager().apply("org.example.greeting");

        assertTrue(project.getTasks().getByName("hello") instanceof GreetingTask);
    }
}
实现集成测试
让我们看看一个与另一个系统交互的类,即发出 HTTP 调用的那部分代码。在执行 DefaultHttpCaller 类的测试时,运行时环境需要能够访问互联网。
package org.myorg.http;

import java.io.IOException;
import java.net.HttpURLConnection;
import java.net.URI;
import java.net.URISyntaxException;

public class DefaultHttpCaller implements HttpCaller {
    @Override
    public HttpResponse get(String url) {
        try {
            HttpURLConnection connection = (HttpURLConnection) new URI(url).toURL().openConnection();
            connection.setConnectTimeout(5000);
            connection.setRequestMethod("GET");
            connection.connect();

            int code = connection.getResponseCode();
            String message = connection.getResponseMessage();
            return new HttpResponse(code, message);
        } catch (IOException e) {
            throw new HttpCallException(String.format("Failed to call URL '%s' via HTTP GET", url), e);
        } catch (URISyntaxException e) {
            throw new RuntimeException(e);
        }
    }
}
为 DefaultHttpCaller 实现集成测试与上一节中显示的单元测试没有太大区别。
package org.myorg.http

import spock.lang.Specification
import spock.lang.Subject

class DefaultHttpCallerIntegrationTest extends Specification {
    @Subject HttpCaller httpCaller = new DefaultHttpCaller()

    def "can make successful HTTP GET call"() {
        when:
        def httpResponse = httpCaller.get('https://www.google.com/')

        then:
        httpResponse.code == 200
        httpResponse.message == 'OK'
    }

    def "throws exception when calling unknown host via HTTP GET"() {
        when:
        httpCaller.get('https://www.example.invalid/')

        then:
        def t = thrown(HttpCallException)
        t.message == "Failed to call URL 'https://www.example.invalid/' via HTTP GET"
        t.cause instanceof UnknownHostException
    }
}
实现功能测试
功能测试验证插件的端到端正确性。实际上,这意味着应用、配置和执行插件实现的功能。UrlVerifierPlugin 类暴露了一个扩展和一个任务实例,该任务实例使用最终用户配置的 URL 值。
package org.myorg;

import org.gradle.api.Plugin;
import org.gradle.api.Project;
import org.myorg.tasks.UrlVerify;

public class UrlVerifierPlugin implements Plugin<Project> {
    @Override
    public void apply(Project project) {
        UrlVerifierExtension extension = project.getExtensions().create("verification", UrlVerifierExtension.class);
        UrlVerify verifyUrlTask = project.getTasks().create("verifyUrl", UrlVerify.class);
        verifyUrlTask.getUrl().set(extension.getUrl());
    }
}
每个 Gradle 插件项目都应该应用 插件开发插件,以减少样板代码。通过应用插件开发插件,测试源集已预配置为与 TestKit 一起使用。如果我们想为功能测试使用自定义源集,而将默认测试源集仅用于单元测试,我们可以配置插件开发插件以在其他位置查找 TestKit 测试。
gradlePlugin {
    testSourceSets(functionalTest)
}gradlePlugin {
testSourceSets(sourceSets.functionalTest)
}Gradle 插件的功能测试使用 GradleRunner 实例来执行正在测试的构建。GradleRunner 是 TestKit 提供的一个 API,它内部使用 Tooling API 来执行构建。
以下示例将插件应用于正在测试的构建脚本,配置扩展并使用任务 verifyUrl 执行构建。请参阅 TestKit 文档 以更熟悉 TestKit 的功能。
package org.myorg

import org.gradle.testkit.runner.GradleRunner
import spock.lang.Specification
import spock.lang.TempDir

import static org.gradle.testkit.runner.TaskOutcome.SUCCESS

class UrlVerifierPluginFunctionalTest extends Specification {
    @TempDir File testProjectDir
    File buildFile

    def setup() {
        buildFile = new File(testProjectDir, 'build.gradle')
        buildFile << """
            plugins {
                id 'org.myorg.url-verifier'
            }
        """
    }

    def "can successfully configure URL through extension and verify it"() {
        buildFile << """
            verification {
                url = 'https://www.google.com/'
            }
        """

        when:
        def result = GradleRunner.create()
            .withProjectDir(testProjectDir)
            .withArguments('verifyUrl')
            .withPluginClasspath()
            .build()

        then:
        result.output.contains("Successfully resolved URL 'https://www.google.com/'")
        result.task(":verifyUrl").outcome == SUCCESS
    }
}
IDE 集成
TestKit 通过运行特定的 Gradle 任务来确定插件类路径。即使从 IDE 运行基于 TestKit 的功能测试,您也需要执行 assemble 任务来最初生成插件类路径或反映其更改。
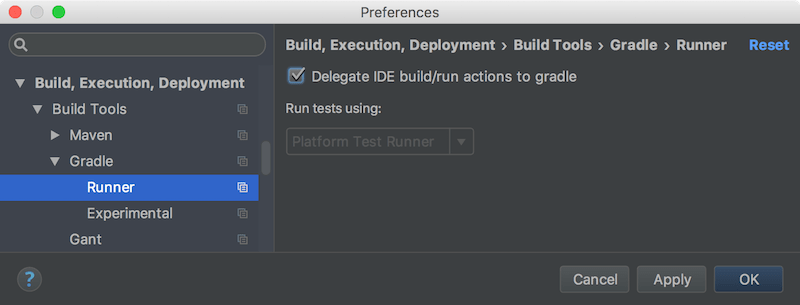
一些 IDE 提供方便的选项,将“测试类路径生成和执行”委托给构建。在 IntelliJ 中,您可以在 Preferences... > Build, Execution, Deployment > Build Tools > Gradle > Runner > Delegate IDE build/run actions to Gradle 下找到此选项。
